
The online scheduling functionality has been a great tool for clinics and offices, as in addition to automating work, there can be a significant increase in the number of appointments.
Bringing practicality not only to the clinic that can relocate its reception staff, but the patient also has its advantages increased. With online scheduling, the patient will be able to view and analyze more calmly what times are available for their consultation, and there will be the possibility to do so any day and time, as online scheduling is available 7 days a week, 24 hours a day.
Just a pause before we continue, did you know that the Ninsaúde Apolo clinic and office management system is perfect for health clinics? We always work with new improvements, and discover exclusive advantages here.
Here on Apolo's blog, we have some articles talking about the advantages and even how to integrate online scheduling on the clinic's website. If you missed any of these posts, you can stay inside by pressing the links below:
- Main advantages of online scheduling
- Online scheduling: how to advertise?
- How does Ninsaúde Apolo's online scheduling work?
Now that you have access to all these tips, it's time to learn how to insert the link for online scheduling on your social networks, more precisely on Facebook and Instagram, which are the most used networks today.
To start using this tool it is necessary to have a profile (commercial or not) on Instagram, or in the case of Facebook, a Fanpage, which has different aspects compared to a simple profile.
Fan page is a specific page within Facebook, whose purpose is to create a direct communication channel with customers and fans, aiming to enable interaction, monitoring activities and engaging with followers.
Fanpages are created from a Facebook profile, that is, you cannot create a page unless you have a personal profile linked to it before. But remember: what you post on the fan page only its followers will see, and what you post on your personal profile, only your friends will see (if the posts are not in public mode). The fan page needs a profile that gives rise to it, but the two work independently of each other.
Now that you know how this whole part works and have already created a fan page for you, your clinic, or your office, let's get to the point: how to put the online scheduling link on your page.
1) Access your fan page, and on the right side of the screen, just below the cover photo, hover your mouse over the "Send Message" button and press the "Edit button" option.
Note: there may be another command instead of "Send message", where it is described as "Contact us", as this is a customizable Facebook button. However, it will always be located on the right side of the screen, next to a pencil icon, giving the idea of editing.
2) After clicking on the "Edit button", some options will appear. Click on the first option, "Make a reservation with you", then select "Book now" and press the "Next" button.
3) The next step is to define where you would like this button to direct people, which in this case will be for online scheduling. First, it is necessary to press the option "Link to website"
Then, you must enter the link for the online appointment. This link can be found in the Apolo system health professional register. Remember that the link can be generated to schedule with all professionals in the clinic or only with the specific professional, you choose the moment you copy it. After copying on the system and pasting it on Facebook, press "Save".

4) After clicking save, press the Finish button, and ready, your fan page will already be accepting that patients use Ninsaúde Apolo's online scheduling.
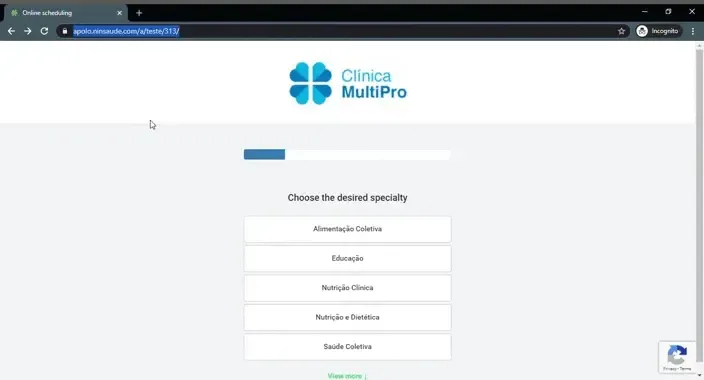
After all these steps are done, whenever someone presses the "Book now" button, they will be redirected to the online scheduling page, where they must inform which specialty they wish to consult (if the link corresponds to the entire clinic), which agreement uses, which service you want to schedule, and finally, what date and time you want to be attended to.
To insert the link in an Instagram profile is very simple. Access your profile and press the "Edit profile".
Then, you must insert the link of the online appointment (the same link that is found in the register of health professionals within the system), in the Website field, and describe your activities in the Biofield. When finished, press the icon in the upper right corner of the screen (in the image circled in red).
In the Biofield, we suggest that in addition to describing the clinic's activities, signal to the patient to know where to click to make the appointment. You can write "Schedule your appointment online by clicking the link below", for example.
See how easy it is? Now with this super detailed step-by-step, you have no excuses for not benefiting from this incredible tool, totally free for Ninsaúde Apolo users.
Not a system user yet? Contact us and request a call from one of our salespeople.
